
Lens flare done correctly has been an acceptable phenomenon for decades. Although it means balls of light intrude on your composition, it can be pretty cool. Exhibit A:

Although I made no conscious attempt to achieve lens flare, it still works for several reasons. One, it brings a symmetry to the picture - the sun at the very top is centered, bringing rays of light straight down through the grass. This ends up throwing the lens flare spots near the bottom, where they are relatively unobtrusive. Also, the color of the flare is pretty close to the color of the grass, so again, it doesn't markedly stand out.
Contrast that with Exhibit B:
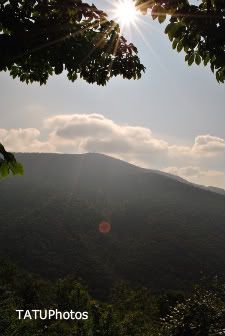
The lens flare is red and far too stark and noticeable against the green treetops. It sits squarely in the middle of the mountain view, so it can't be ignored. It basically is a big chicken pox mark in the middle of an otherwise very nice picture that I will never be able to use without learning some serious Photoshop.
So, what to do? Well, according to Dickson's article that I linked to above, there are five simple things you can do if you want to purposely create good lens flare.
1. Logically, shoot into the sun. Your camera can handle it (but not for very long!).
2. Position your subject with its back to the sun.
3. Use manual mode to overcompensate for the backlight, because your camera's automatic metering may think otherwise.
4. Shoot at an angle.
5. Use manual focus to clarify your subject, to prevent your camera from focusing on that big sun you're aiming at.
What if you don't want lens flare? What if it's ruining your picture? According to Darren Rowse:
1. Use a lens hood. You know, the big circular flap professionals always have on their camera in pictures of them on the job...even on a cloudy day or indoors...or just posing for a still shot...
2. Use your hand to act as a lens hood if you don't have one. Be sure to try out different angles.
3. Try a slightly different focal length with your zoom lens.
4. Move. It may only require a slight adjustment and you can still maintain something close to the original composition you wanted.
5. Re-place objects in your composition to block the flare; a tree, a person, the corner of a building, etc.
Usually lens flare is so quirky and bright that it adds something to your photograph that you weren't expecting, and you end up pleasantly surprised. There are many, many different ways it can show up (think the rotating spots that appear in footage of the sun cresting over the earth from space), and I personally think that, after you learn how to avoid bad lens flare, it would be way more fun to spend time learning how to use it.
This is one example of what I especially like about this blog. Not only do we get to see some amazing photos by the blog's author and others, but we get information. Specific hints and helps and links to address issues any of us who enjoy taking photos can put directly to use. Thanks Again!
ReplyDeleteYou're welcome! Glad I can help. :)
ReplyDelete